Question 4
HOW DID YOU USE NEW MEDIA TECHNOLOGIES IN THE CONSTRUCTION AND RESEARCH, PLANNING AND EVALUATION STAGES?
PICMONKEY-
How we edited some of our photos
We used a online editing website called PICMONKEY to edit our photos. You can crop photos using the rule of thirds. You can also adjust the exposure of the image. Another good tool is touch ups. You can air brush photos, make the subjects eyes brighter, as well as other useful utilities. You can also add effects to the image. For example, focal soften, lens flare and Polaroid. You can also overlay textures on the image. When adding textures, you can adjust the blend mode which helps you create the effect you want. There are overlays which you can add to your image, you can use the site's or you own from your computer. "Creepy Text" is another useful feature to this website. When adjusting the colour of the text you can adjust the blend mode to match how you want the text to appear. PICMONKEY also releases different themes for different times of the year. The Halloween theme fits in nicely with horror. Once you've finished editing, simply ave the image straight to your computer.
-CD
-CD
JIXSAWPLANET-
How We Made Our Site Interesting.
To make our website interesting on our website we used another site called JIXSAWPLANET to make our magazine cover into a puzzle.When you create the Jigsaw you can adjust the difficulty, as well as the space of the pieces. All we did then was upload it to the website.
-CD
-CD
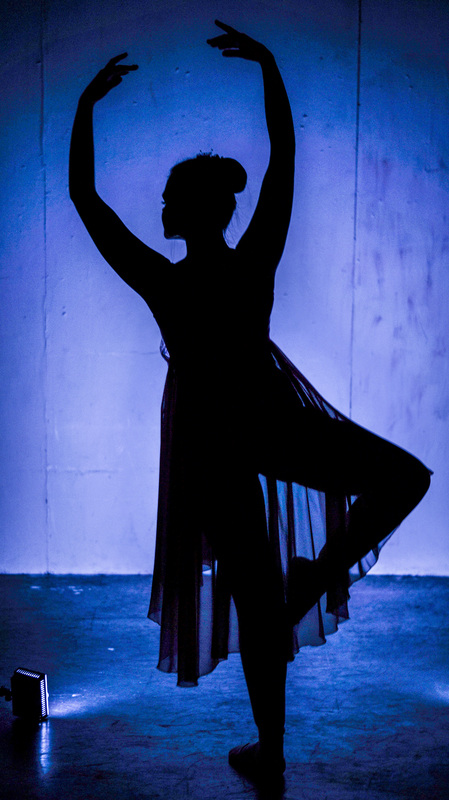
We used PHOTOSHOP to edit our photos, we mainly used it for the magazine cover and poster as it is a high quality photo editing software. when editing a photo you can adjust the "curves" of the image to make the lights and the shadows to contrast your taste. You can also adjust the colours of the image till you get the exact colours you need. On PHOTOSHOP you can add "Filters" to the image to create different overlays or effects. You can add text to your photos, we found this useful a when choosing the front for your trailer we had to download it, so we could use the same version when creating our poster. Here I am using the "Magic Wand" tool to select the ballerina's silhouette as to overlay it on top of the title. In PHOTOSHOP you can add layers. Here I am adding a theater stage to the background to make the dancer look like she is on a stage. by adjusting the opacity of the image, I can clearly see what parts of the original image to select and delete. Using the RUBBER tool, I m erasing the faint purple outline of the dancer to blend her into the stage layer naturally. On PHOTOSHOP; you can make your text 3D. The version of PHOTOSHOP I am using doesn't have the same 3D tool as the one I used for our final poster. after finishing your edit, you can save the picture straight to your computer as either a PHOTOSHOP file, a JPG, PNG and other file types.
-CD
-CD
|
|
MUSIC/FINAL CUT PRO-
How we found our music and what we edited everything on.
We used Youtube to find the background music or moving images. We then used CLIPCONVERTER to download the moving clips or music into MP3 or MOV Files. We also used YOUTUBE-TO-MP3 to download some of our music tracks. We would then use FINAL CUT to edit everything together. We can import media off our camera straight onto final cut. When editing our trailer you can drag and drop clips into the timeline. Once they are on the timeline we can crop clips accurately by dragging the end or the front of the clip to the right place. We can use overlays to change the look of certain clips. We can add transitions in. We can add titles over the clip; you can change the font and colour of the text. You can change the speed of clips and reverse them.
-CD
-CD
